초보자 가이드
기지 구축, 첫 원정, 주요 NPC, 유용한 팁까지 다루는 Escape from Duckov 초보자 가이드입니다.
Escape from Duckov 초보자 가이드
1. 기지 구축과 초반 퀘스트
난이도 선택
- 난이도 변경: 기지 책상 옆에서
F키를 눌러 언제든지 게임 난이도를 조정할 수 있습니다. - Survival 난이도: 영상에서 선택된 난이도로, 더 높은 난이도의 도전을 제공합니다.
보관과 준비
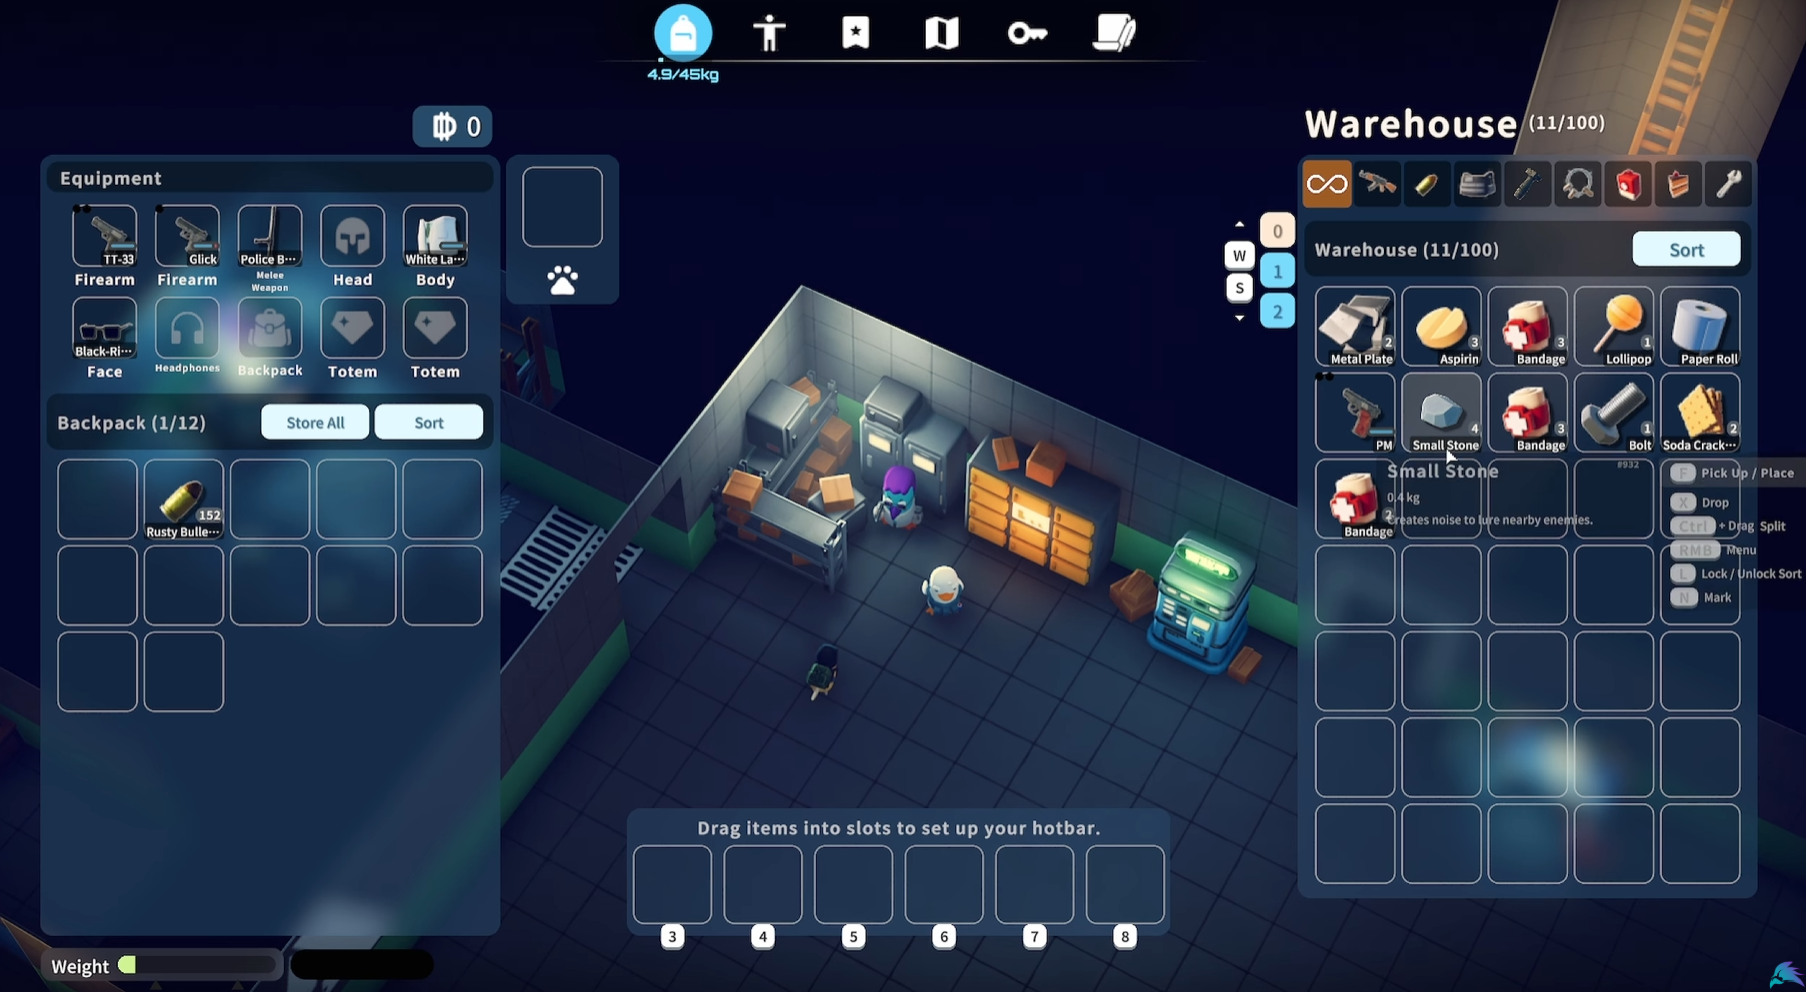
- 보관함: 레이드에 가져가고 싶지 않은 아이템은 모두 보관함에 넣으세요.
- 슬롯 잠금:
L키로 특정 슬롯을 잠그면 "모두 보관" 사용 시에도 이동하지 않아 실수로 저장되는 일을 막을 수 있습니다. - 아이템 태그: 제작 또는 퀘스트 화면에서 필요한 아이템에
N키를 누르면 하트 아이콘이 붙어 루팅할 때 쉽게 알아볼 수 있습니다.
초기 퀘스트
Jeff에게 말을 걸어 다음 퀘스트를 수락하세요.
- 작업대 제작: 나무 2개가 필요합니다.
- Start-up Capital: 적을 처치하고 "Ground Zero" 맵에서 성공적으로 탈출하세요.
2. 첫 원정: Ground Zero
루팅과 생존
- 장비: 탄약 용량이 넉넉한 Glick 권총을 추천합니다. 붕대와 Aspirin 같은 회복 아이템은
5번 등 단축키에 등록해 두세요. - 적: Rampaging Scavenger는 근접 공격력이 높으니 주의하십시오. 무기를 휘두를 때 붉은 빛이 번쩍이며, 이때 스페이스바로 구르기를 사용하면 피할 수 있습니다.
- 우선 루팅 아이템:
- Cash: 특정 NPC와 거래에 사용되는 신규 화폐입니다.
- Keys: Dorm Key와 Cellar Key는 가치가 높습니다.
- Circuit Board: 키 등록 장치 등 초반 퀘스트에 필요합니다.
- Herat: 출혈을 멈추는 지혈제입니다.
추출 팁
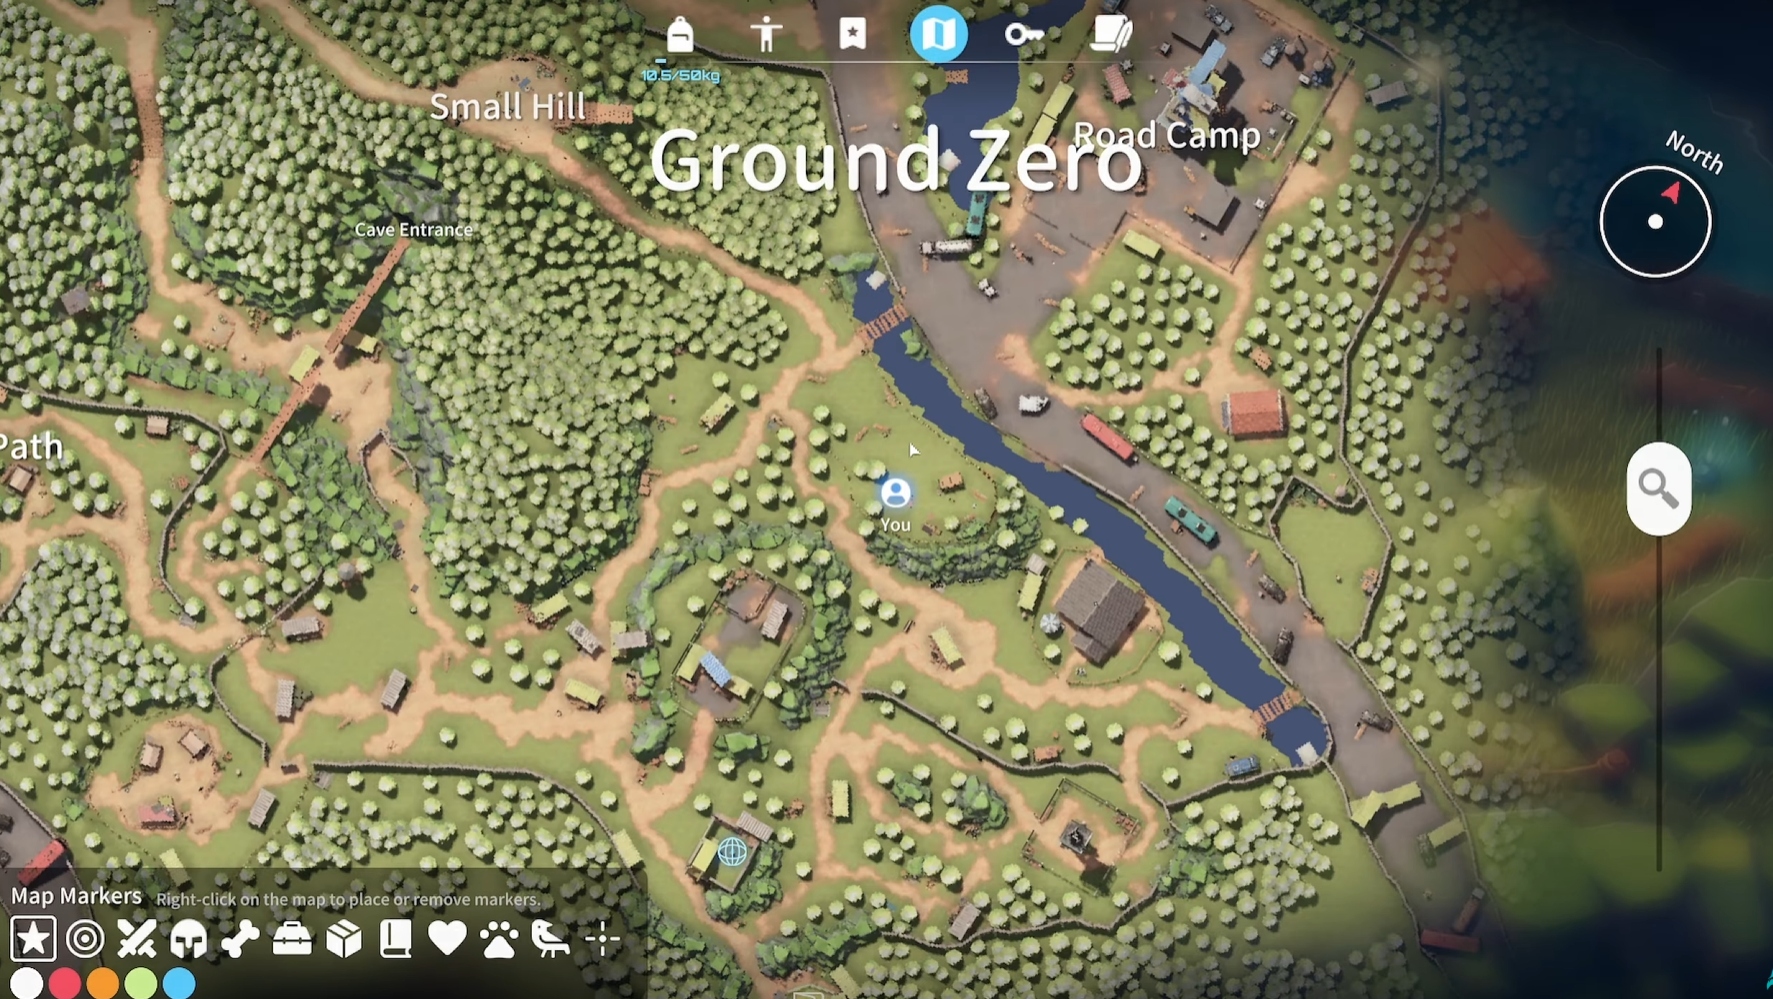
- Ground Zero에서는 지도에 표시된 추출 지점까지 갈 필요가 없습니다. 기지 입구로 돌아오기만 하면 안전하게 탈출할 수 있습니다.
- 팁: 충분히 루팅했다면 욕심내지 말고 귀환하세요. 짧은 주기로 자주 드나드는 것이 안전합니다.
3. 기지 업그레이드와 NPC 해금
건설과 업그레이드
- 작업대: 나무로 건설하며, 가능한 빨리 업그레이드해 더 많은 기능과 제작법을 해금하세요.
- 키 등록 장치: Circuit Board와 CD-ROM 등이 필요합니다. 등록해 두면 획득한 열쇠가 자동으로 장치에 저장되어 들고 다닐 필요가 없습니다.
- 체육관: 건설하면 Mud NPC가 등장합니다.
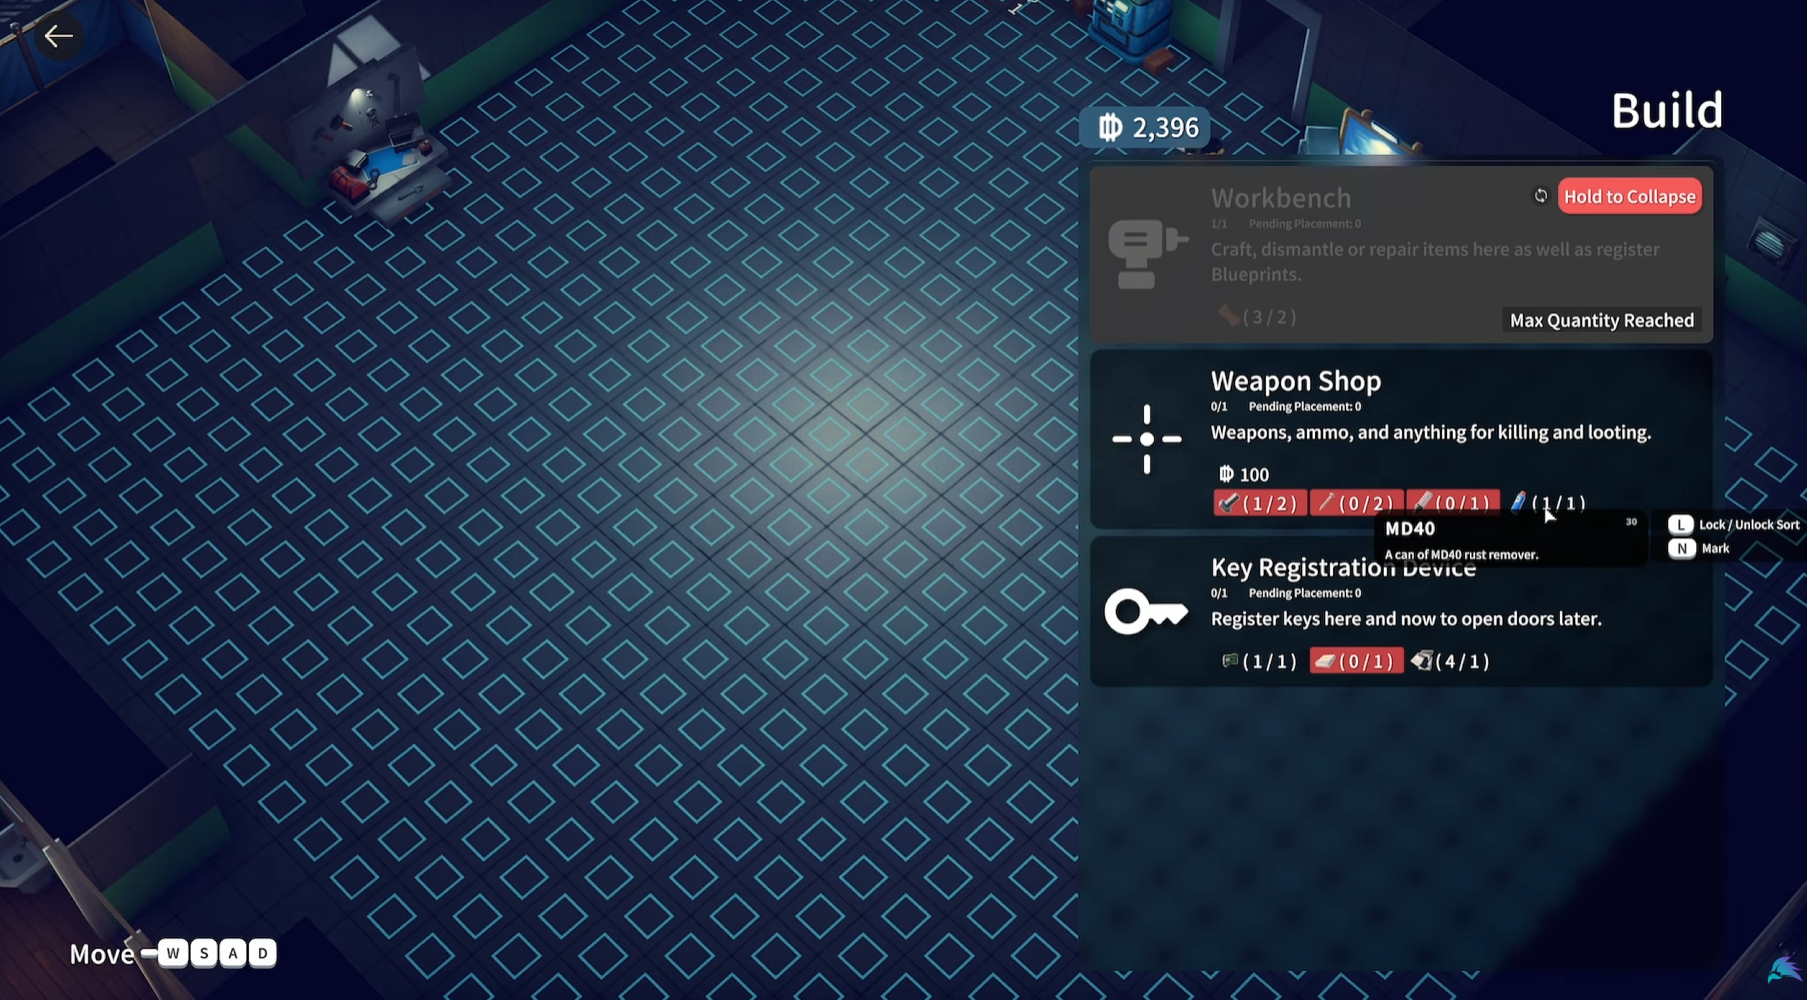
[삽입용 이미지: 작업대 건설/업그레이드 화면 (N 키 태그 강조)]
지식과 팁
- 아이템 태그 (N): 희귀 퀘스트 아이템은 반드시 표시해 두면 편합니다.
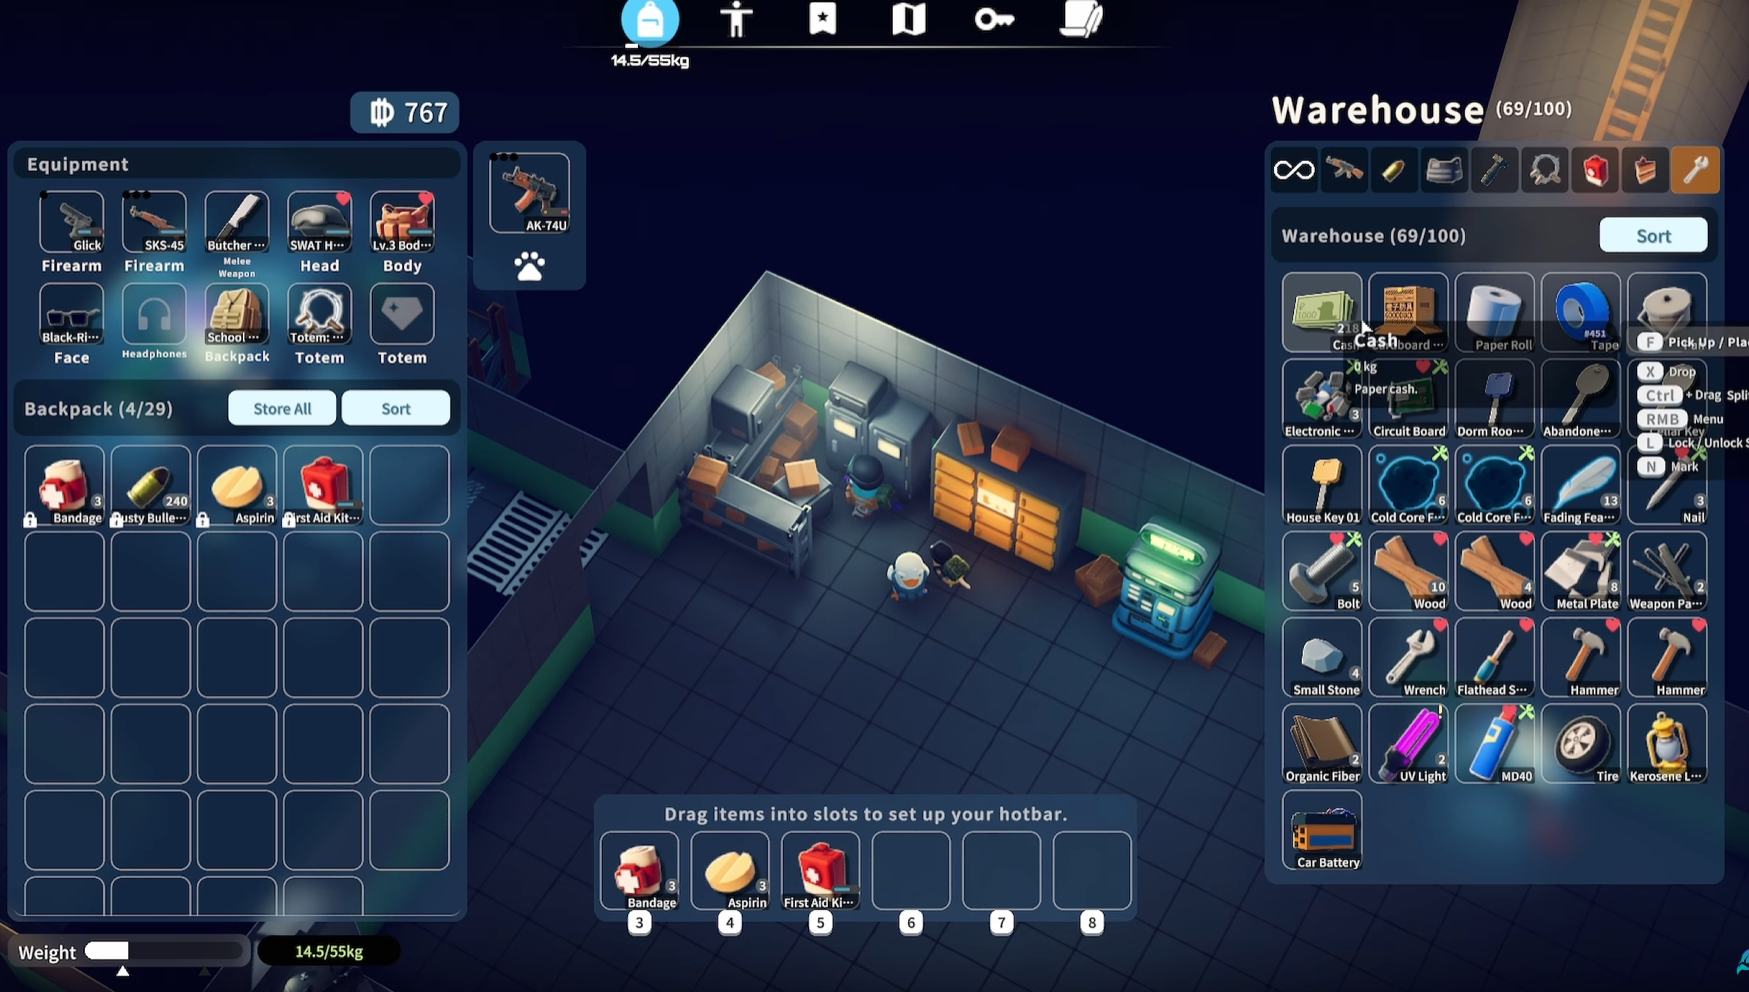
- 중량 아이템 관리: Car Battery 같은 무거운 아이템은 **"펫 슬롯"**에 넣으면 무게가 증가하지 않습니다.
- 특성 업그레이드: "Perk Palace"에서 Cash와 Core Fragment를 사용해 특성을 강화하세요. 가방 무게나 공간을 늘려 주는 Backpack Expert를 우선 투자하면 좋습니다.
4. 주요 NPC 만나기
체육관 코치 Mud
- 해금: 체육관을 건설하면 등장합니다.
- 초기 의뢰: Duck Egg 1개와 Soda Crackers가 필요하며, 이후에는 담배를 요구합니다.
- 체력 단련: 체육관 훈련으로 체력 등 능력치를 영구적으로 올릴 수 있습니다. 초반에는 무료이지만 나중에는 식량이 필요합니다.
의문의 상인
- 위치: Ground Zero의 작은 언덕 위에 있습니다.
- 역할: Cash로 꿀, 펜, IV 약품 등 퀘스트 아이템을 판매합니다.
- 팁: 현금을 들고 레이드에 갈 경우 펫 슬롯에 넣어 사망 시 잃지 않도록 하세요.
주요 아이템 위치 팁
- 꿀 스폰 지점: Ground Zero 언덕 꼭대기 벌집 주변에서 등장합니다. 확정 스폰은 아니지만 들를 가치가 있습니다.
5. 이후 원정과 기지 확장
이동과 해금 요소
- 빠른 이동:
C키로 무기를 넣으면 이동 속도가 빨라집니다. - 하수도 입구 해금: 이전에 다리를 복구했던 도로의 장애물을 제거하면 Ground Zero의 새로운 입출구가 열립니다.
- 표식 퀘스트 (32:10): Armorer 퀘스트에서 지정한 모닥불 텐트 옆 보급 상자를 표시하려면 Marker를 구매하세요.
- 동굴 해금: 금속과 나무로 다른 다리를 수리하면 어부의 일기에 언급된 동굴에 접근할 수 있으며, 데이터 박스와 Cube Gun 등의 설계도/무기를 얻을 수 있습니다.
- 낚시 노트: 날씨와 시간대별로 등장하는 물고기 정보를 기록합니다.
- 고방사선 구역 (Storm Contamination): 입장하려면 JAB 레벨 3 증명서가 필요합니다.
장비와 제작
- 방어구 상점: 건설하면 SWAT Helmet 등 고급 방어구와 헬멧을 구매해 초반 생존력을 크게 높일 수 있습니다.
- 기술 센터: Power Cord와 Nut이 필요하며, 새로운 NPC와 퀘스트가 해금됩니다.
- 설계도 등록: 발견한 설계도는 "Blueprint Research"에서 즉시 등록해 보관함 공간을 확보하고 중복 획득을 방지하세요.
- 수리 벤치: 작업대를 Advanced Processing으로 업그레이드하면 해금되며, AK-74U 같은 약탈 무기를 수리할 수 있습니다.
핵심 팁: 빠른 이동
- 텔레포트 버블 해금: 다이너마이트를 찾아 기지 입구 밖 부서진 벽을 폭파하세요.
- 효과: 지름길이 열려 "버블"을 통해 맵 양 끝을 즉시 이동할 수 있어 추출과 사망 후 시체 회수 효율이 크게 향상됩니다.

6. 고급 전투와 부활
- 헤드샷: 스캐빈저 처치 같은 일부 퀘스트는 헤드샷이 필요합니다.
- Big Boy: Ground Zero의 강력한 보스로, 장비가 갖춰지기 전까지는 교전을 피하세요.
- 사망 패널티: 사망하면 소지품을 모두 잃습니다. 회수 전에 다시 사망하면 이전 시체 가방을 영구적으로 잃습니다.
- 시체 회수: 가능한 빨리 시체 위치로 돌아가 아이템을 회수하세요. 다이너마이트로 해금하는 텔레포트 버블이 빠른 회수에 큰 도움이 됩니다.
핵심 조언: 기지 시설을 적극 활용하고, 방어구 상점과 수리 기능을 우선 해금한 뒤 Backpack Expert 특성에 투자하세요. 또한 가능한 한 빨리 텔레포트 버블을 열어 탈출 루트를 확보하면 Duckov 탈출에 큰 도움이 됩니다!--- title: "Beginner's Guide" description: "A beginner's guide to Escape from Duckov, covering base setup, first expedition, important NPCs, and useful tips." category: beginner topics:
- Basics
- Contracts
- First Hour
Escape from Duckov Beginner''s Guide
1. Base Setup and Initial Quests
Difficulty Selection
- Change Difficulty: You can change the game difficulty at any time by pressing the
Fkey next to the table in your base. - Survival Difficulty: The difficulty chosen in the video, offering a greater challenge.
Storage and Preparation
- Stash: Store all items you don''t want to take with you on a raid.
- Locking Slots: Press the
Lkey to lock specific item slots, preventing them from being stored accidentally when using the "Store All" button. - Item Tagging: In the crafting or quest interface, press the
Nkey on an item you need to tag it. This will help you spot it while looting (a heart icon will appear next to the item).
Initial Quests
Talk to Jeff to accept quests:
- Build a Workbench: Requires 2 Wood.
- Start-up Capital: Kill any enemy and successfully extract from the "Ground Zero" map.
2. First Expedition: Ground Zero
Looting and Survival
- Equipment: It is recommended to carry a Glick pistol due to its large ammo capacity. Make sure to set hotkeys for healing items like bandages and aspirin (e.g., set to
5). - Enemies: Watch out for Rampaging Scavengers. They are melee units with high damage. A red light will flash when they swing their weapon, which you can dodge by rolling with the spacebar.
- Priority Items:
- Cash: A new item that can be used to trade with specific NPCs.
- Keys: Dorm Key and Cellar Key are very valuable.
- Circuit Board: Needed for an early quest (Key Registration Device).
- Herat: A hemostatic drug to stop bleeding.
Extraction Tips
- In Ground Zero, you don''t need to reach an extraction point on the map. Simply return to the base entrance to extract safely.
- Tip: Return after looting enough items. Don''t be greedy; you can enter and exit the raid frequently.
3. Base Upgrades and NPC Unlocks
Construction and Upgrades
- Workbench: Build with wood. Upgrade it as soon as possible to unlock more advanced functions and crafting recipes.
- Key Registration Device: Requires a Circuit Board, CD drive, etc. Once registered, found keys will go into the device, so you don''t need to carry them.
- Gym: Building it will unlock the Mud NPC.
[Insert Image: Workbench construction/upgrade interface (highlighting the N key tag)]
Knowledge and Tips
- Item Tagging (N): Again, tag uncommon quest items.
- Handling Heavy Items: Heavy items like Car Batteries should be placed in the "Pet Slot" so they don''t add to your weight.
- Perk Upgrades: Spend cash and core fragments at the "Perk Palace" to upgrade talents. Prioritize upgrading skills like Backpack Expert that increase carry weight or space.
4. Meeting Important NPCs
Mud the Gym Coach
- Unlock: Appears after building the gym.
- Initial Quest: Requires 1 Duck Egg and Soda Crackers. Later requires cigarettes.
- Physical Training: Training in the gym can permanently increase attributes like health. Early training is free, but later requires food.
Mysterious Merchant
- Location: On the small hill in Ground Zero.
- Function: Use Cash to buy quest items like honey, pens, IV drugs, etc.
- Tip: When entering a raid with cash, it''s recommended to place it in the Pet Slot to prevent losing it upon death.
Key Item Location Tips
- Honey Spawn Point: Near the beehive on top of the small hill in Ground Zero. It''s not a guaranteed spawn, but it''s worth checking.
5. Later Expeditions and Base Expansion
Movement and Unlocks
- Fast Movement: Press the
Ckey to put away your weapon and run faster. - Unlock Sewer Entrance: Go to the road where you previously unlocked the bridge and remove the obstacle to open a new entrance/exit for Ground Zero.
- Marking Quest (32:10): Buy a Marker to mark the supply crate next to the campfire tent specified by the Armorer''s quest.
- Unlock Cave: Repair another bridge (requires metal and wood) to access the cave mentioned in the fisherman''s diary. Inside the cave, you can find data boxes, recipes/weapons like the Cube Gun.
- Fishing Notes: Records different fish that appear in different weather/times, which is knowledge for fishing.
- High-Radiation Zone (Storm Contamination): Requires a JAB Level 3 Certificate to enter.
Equipment and Crafting
- Armor Shop: After building it, you can buy better armor and helmets (like the SWAT Helmet), significantly increasing early-game survivability.
- Tech Center: Requires a Power Cord and Nuts. Unlocks a new NPC with quests.
- Blueprint Registration: Immediately register found blueprints at "Blueprint Research" to free up stash space and prevent picking up duplicates.
- Repair Bench: Unlocked after upgrading the workbench to Advanced Processing. Allows you to repair damaged weapons from scavengers, such as the AK-74U.
Key Tip: Fast Travel
- Unlock Teleport Bubble: Find a Dynamite and detonate it at the broken wall outside the base entrance.
- Effect: This will open a shortcut, allowing you to instantly travel between two ends of the map through the "bubble," greatly improving the efficiency of extracting and retrieving your body after death.
6. Advanced Combat and Revival
- Headshots: Some quests (like killing scavengers) require headshots to count.
- Big Boy: A powerful boss in Ground Zero. Avoid fighting him in the early game when you are not well-equipped.
- Death Penalty: You will lose all carried items upon death. If you die again, you will permanently lose the body bag from your previous death.
- Body Recovery: You should return to your body''s location as soon as possible to recover your items. Unlocking the Teleport Bubble (Dynamite) is key to ensuring a quick recovery.
Core Advice: Make full use of your base facilities, prioritize unlocking the armor shop and repair function, invest in the Backpack Expert perk, and open up the Teleport Bubble as soon as possible. Good luck on your escape from Duckov!