Escape from Duckov Core Game Mechanics Guide
An in-depth guide to the core game mechanics of Escape from Duckov, covering base management, combat, exploration, and survival.
Escape from Duckov Core Game Mechanics Guide
I. Base Management and Crafting System
1. Base Functions and Difficulty Settings
- Difficulty Setting: The game difficulty (e.g., Survival) can be changed at any time at the table in the base (press the
Fkey). - Blueprint Research: After finding the blueprint research station in the base, you must register the looted blueprints (e.g., Cube Gun Recipe) to unlock the manufacturing recipe and clear up backpack space.
- Upgrading Buildings: Buildings such as the workbench, tech center, and gym can be upgraded to unlock more advanced manufacturing and functions. For example, upgrading the workbench to Advanced Processing unlocks the weapon repair function.
2. Stash and Item Locking
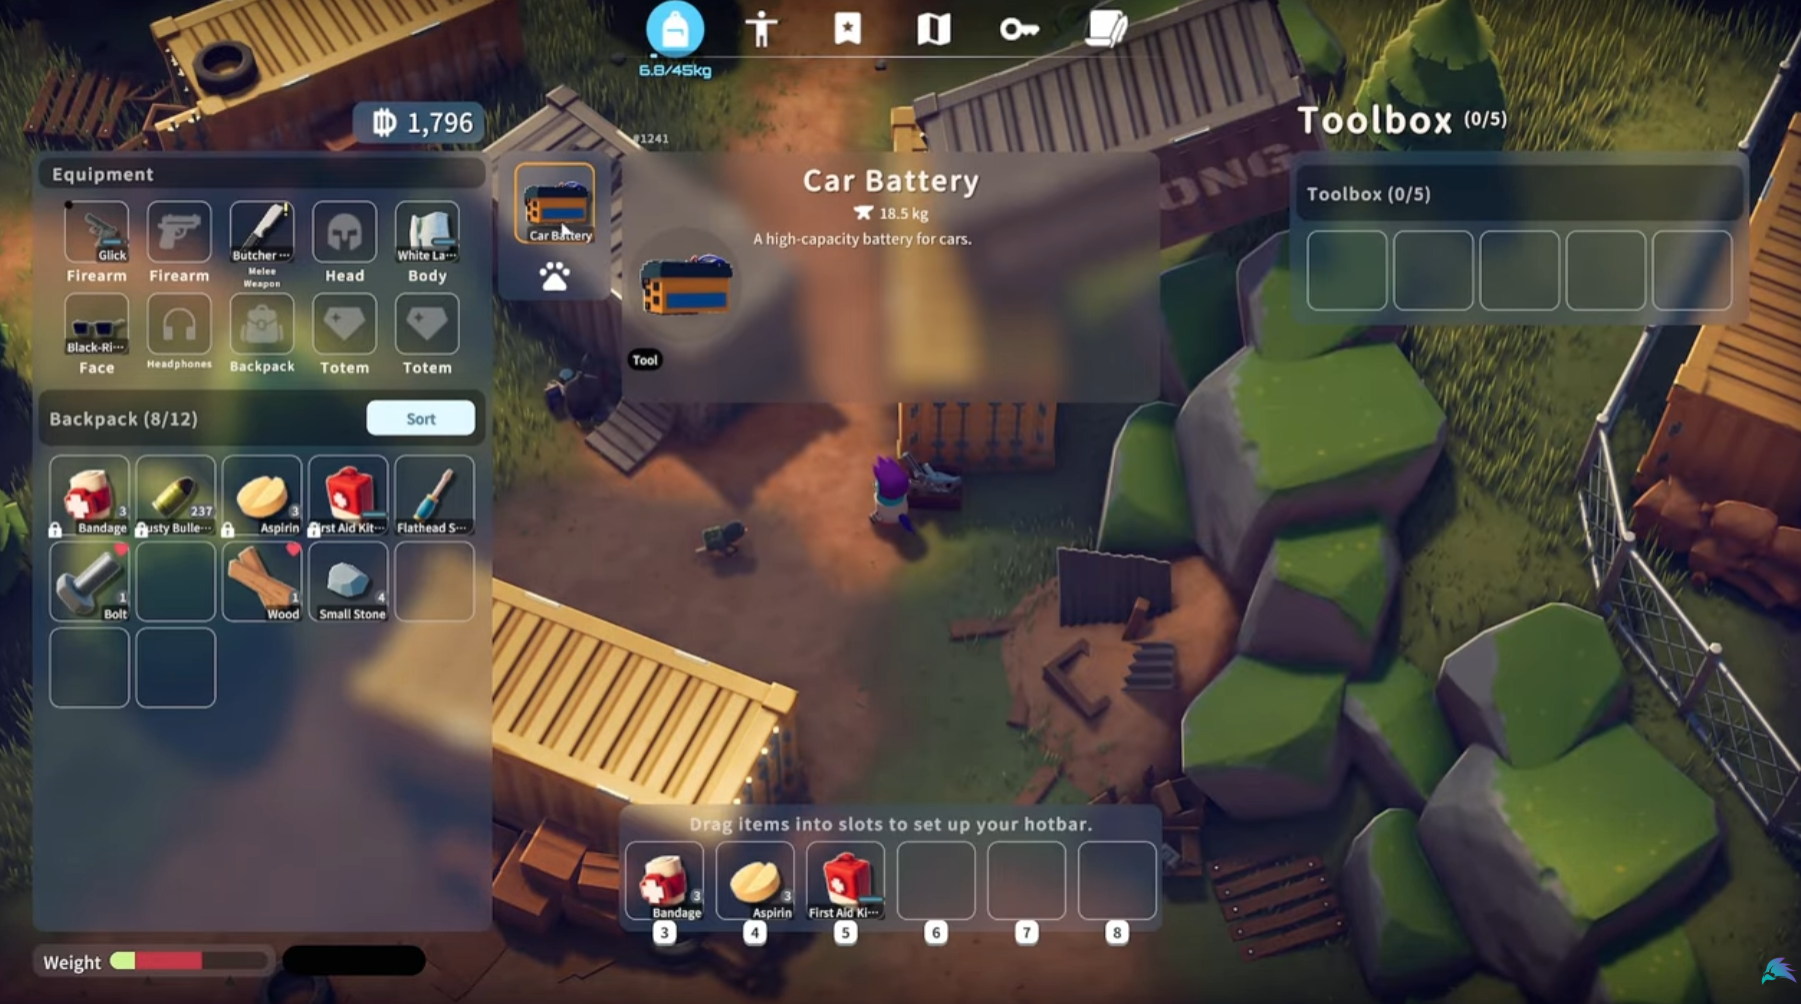
- Stash and Warehouse: The base stash is a safe area for your items. Pressing "Store All" will move all items into the warehouse.
- Slot Locking (L key): Press the
Lkey to lock an item slot. Locked items will not be moved by "Store All" or sold, which is used to protect equipment you don't want to accidentally transfer. - Warehouse Upgrade: The warehouse space can be expanded by spending funds and materials.
3. Crafting and Marking (N key)
- Item Marking: In the crafting and upgrade interface, press the
Nkey on the materials you need to add a heart mark next to the item. This is a key mechanism in the game for tracking materials needed for quests or crafting. - Dismantle: Many items in the game (such as Rusty Bullets, plastic products) can be dismantled into basic materials (such as Gunpowder) for crafting or quests.
II. Character Status and Growth Mechanics
1. Character Attributes and Perks
- Perk Palace: The core upgrade system. Unlock permanent buffs by consuming Cash and Core Fragments.
- Highly Recommended: Backpack Expert, which provides additional weight and backpack capacity, is the most worthwhile perk to invest in early on.
- Physical Training: Talk to Mud in the Gym to undergo physical training to permanently increase attributes such as maximum health.
2. Survival and Healing
- Healing Items:
- Bandages/First Aid Kits: Restore health.
- Aspirin: Relieves pain, but causes Dehydration, so be sure to drink water after use.
- Herat: A hemostatic drug to deal with the Bleeding status.
3. Movement Mechanics
- Holster Weapon to Speed Up (C key): After pressing the
Ckey to holster your weapon, the character's movement speed will be slightly faster, especially when using a rifle. - Dodge Roll (Space Bar): When fighting melee enemies, you can use a dodge roll to evade, which is key to avoiding the fatal blows of Rampaging Scavengers.
III. Combat and Equipment Rules
1. Firearms and Damage
- Ammunition Types: Firearms have different ammunition types (such as S, L, AR rounds). Early firearms (such as the Glick) use S rounds, while the AK-74U uses AR rounds.
- Rusty Bullets: A common early-game ammunition with low damage, requiring more bullets to kill an enemy.
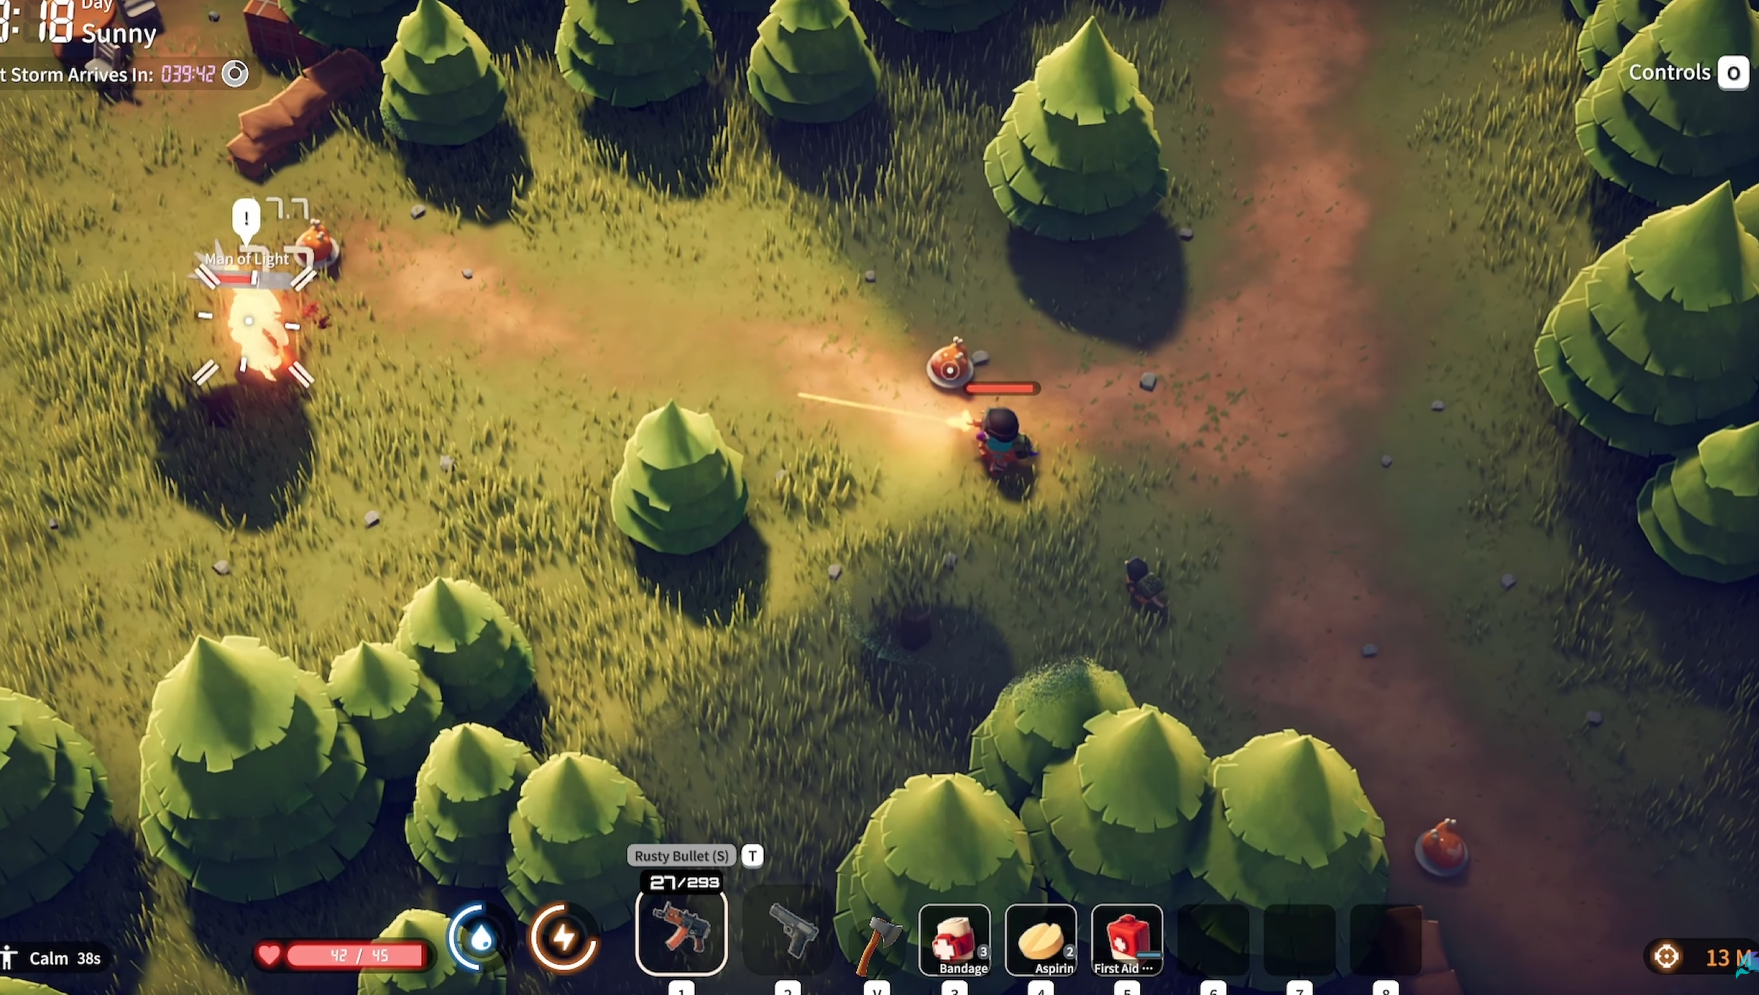
- Aim Distance Indicator (UI): There is a new distance indicator in the lower right corner of the screen that shows whether you are within the optimal range of your weapon.
- Green/White: Indicates that you are within the effective range and damage is maximized.
- Red: Indicates that you are outside the effective range or your aim is inaccurate, and damage will be reduced. This indicator is affected by weapon attachments (such as suppressors, muzzles).
2. Enemy Mechanics
- Rampaging Scavengers: Melee enemies with high damage. There will be a clear red flash before they swing their weapon, which is a signal to remind the player to dodge roll.
- Using Terrain: Sandbags are good cover. When standing behind sandbags, it is difficult for enemies (especially ranged ones) to hit you.
3. Equipment Weight and Protection
- Armor and Helmets: Armor and helmets provide direct damage reduction. Purchasing or crafting high-level armor (such as the SWAT Helmet) can greatly increase your survival rate.
- Durability: Weapons and armor have durability. Damaged equipment can be repaired at a repair workbench (for a fee).
IV. Exploration and Economic System
1. Extraction Mechanics
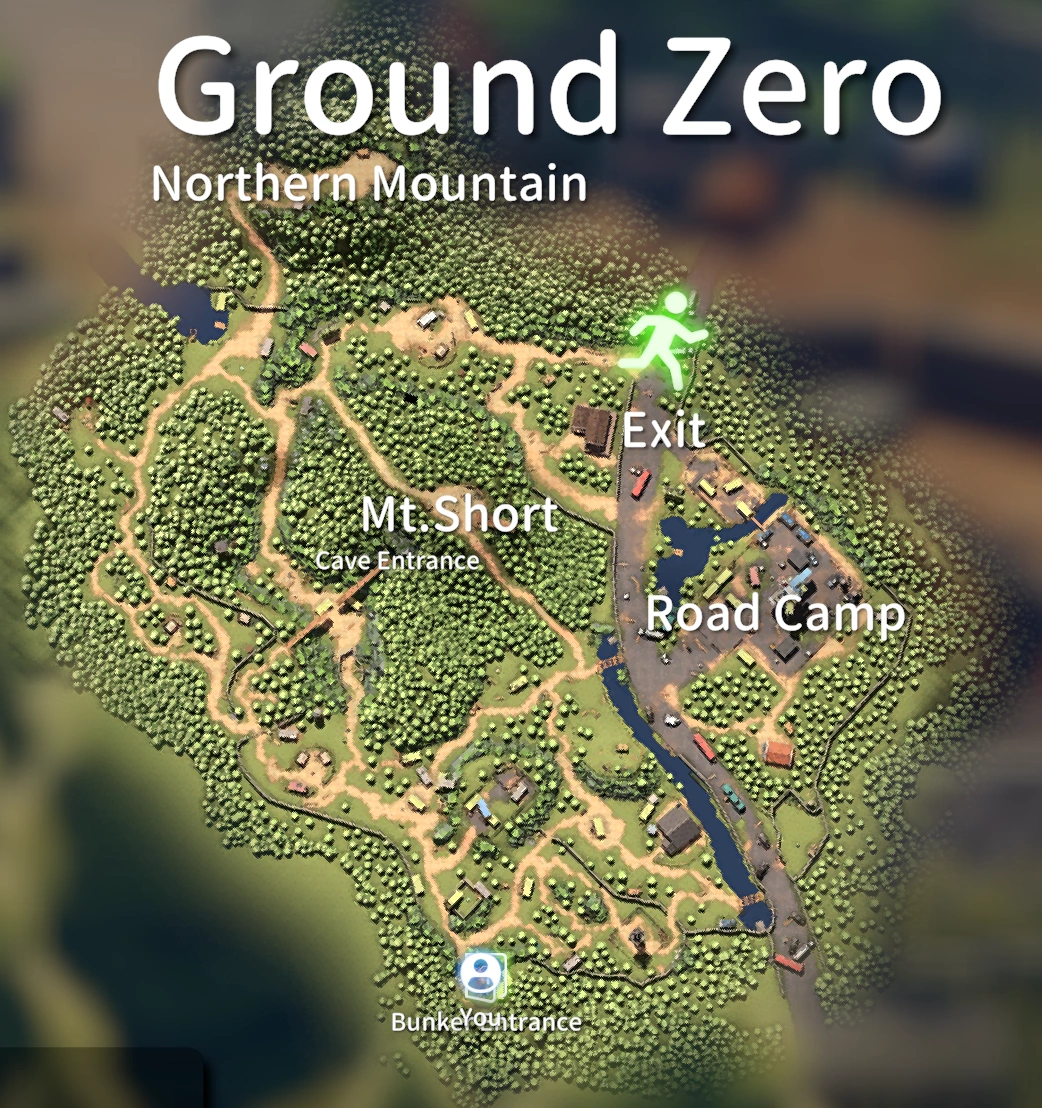
- Specialty of Ground Zero: On the Ground Zero map, you do not need to go to a designated extraction point. Simply return to the base entrance to extract safely.
- Other Maps: Most maps require you to find an extraction point marked with green smoke or a special exit.
2. Scavenging and the Pet Slot
- Pet Slot: Located above the backpack, it is specifically for placing heavy items or valuable items you absolutely do not want to lose (e.g., car batteries, large amounts of cash, key quest items). Items placed in the pet slot do not count towards your weight.
3. Special NPC Trading
- Mysterious Merchant: He is stationed at a fixed location in Ground Zero and you can use Cash to directly purchase many rare quest items (such as Honey, Pen, IV Medicine).
- Tip: To trade with the Mysterious Merchant, you must bring cash into the map before entering the raid.
4. Map Unlocks and Shortcuts
- Sewer Entrance: Unlocked by removing a roadblock on a specific road, providing a second access to and from Ground Zero.
- Teleport Bubble:
- How to Unlock: Use Dynamite to detonate the broken wall outside the base entrance.
- Function: After being blown up, it forms a two-way teleportation shortcut, allowing players to instantly move from one end of the map to the other. It is the most important and must-do map unlock project in the early game.
V. Death and Risk Management
- Death Penalty: Upon death, you will lose all items you are carrying.
- Corpse Recovery: After death, your items will remain in your corpse bag. You need to re-enter the map and find your corpse to recover them.
- Risk of Second Death: If you die again before recovering your corpse bag, you will permanently lose all items in the previous corpse bag. Therefore, you should travel light when recovering your corpse, taking the fastest and shortest route.
- Tip: The teleport bubble (Dynamite shortcut) is the best tool to ensure quick corpse recovery and reduce risk.